フォーム上に配置したボタンを、すべての必須のフォーム フィールドの入力が済むまでクリックできないようにすることができます。このためには、条件付き書式を使用します。条件付き書式の複雑さはフォームによって異なります。
このタスクでは、送信ボタンがあるシンプルなフォームを作成します。次に条件付き書式を追加して、すべての必須フォーム フィールドの入力が済むまでボタンを無効にします。まず、新しい空白のフォームを作成しておきます。
スキーマの作成:
[Data Source] 作業ウィンドウを開きます。
- <!--[if !supportLists]-->「Name」という名前のテキスト フィールドを追加します。このフィールドは必須です。
- <!--[if !supportLists]--><!--[endif]-->「Address」および「Phone」という名前の 2 つのテキスト フィールドを追加します。
- <!--[if !supportLists]-->「Email」という名前のテキスト フィールドを追加します。このフィールドは必須です。
- 「Comments」という名前のリッチテキストフィールドを追加します
リッチ テキスト フィールドが必須であることを要求するカスタムのデータ検証を追加する
リッチ テキスト フィールドが必須であることをデータ ソースで指定することはできないので、カスタムのデータ検証によって手動で指定する必要があります。リッチ テキスト フィールドは、通常のテキスト フィールドとは動作が異なり、空白かどうかを単純にチェックすることはできません。これは、“is blank” (が空白である) の結果が常に正確であるとは限らないからです。
- <!--[if !supportLists]--> <!--[endif]-->[Data Source] 作業ウィンドウの [Comments] をダブルクリックします。
- <!--[if !supportLists]--> <!--[endif]-->[Field Or Group Properties] ダイアログ ボックスの [Validation And Event Handlers] タブで [Add] をクリックします。
- <!--[if !supportLists]--> <!--[endif]-->1 つ目のボックスの一覧の [Expression] をクリックし、次の式を入力します。
- [ScreenTip] ボックスに「Cannot be blank 」と入力し (図 1 を参照)、[OK] を 2 回クリックします。
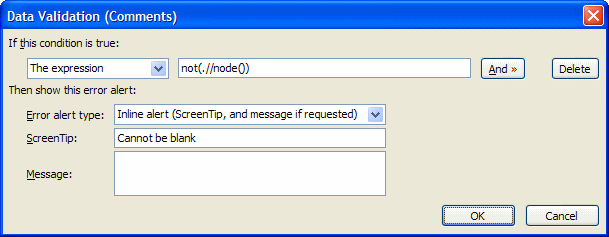
図 1 リッチ テキスト フィールドが必須であることを要求するカスタム検証
ビューの設計
- <!--[if !supportLists]--> <!--[endif]-->[myFields] を右クリックし、[Controls In Layout Table] をクリックします。
- <!--[if !supportLists]--> <!--[endif]-->[Controls] 作業ウィンドウから、ボタンをビューに挿入します。
- <!--[if !supportLists]--><!--[endif]-->ボタンをダブルクリックします。
- <!--[if !supportLists]--> <!--[endif]-->[Button Properties] ダイアログ ボックスの [General] タブで、ラベルを「Submit」に変更し、ID を「btnSubmit」に変更します。
- <!--[if !supportLists]--> <!--[endif]-->[Rules] をクリックし、[Add] をクリックします。
- <!--[if !supportLists]--> <!--[endif]-->動作規則に「Submit」という名前を付け、[Add Action] をクリックします。
- <!--[if !supportLists]--> <!--[endif]-->[Action] ボックスの一覧の [Show A Dialog Box Message] をクリックします。
- <!--[if !supportLists]--> <!--[endif]-->メッセージとして「Form Submitted」と入力し、[OK] を 3 回クリックします。
ボタンを無効にするための条件付き書式を追加する
- <!--[endif]-->[Button Properties] ダイアログ ボックスの [Display] タブで、[Conditional Formatting] をクリックし、[Add] をクリックします。
- <!--[if !supportLists]--> <!--[endif]-->1 つ目のボックスの一覧の [Name] をクリックし、2 つ目のボックスの一覧の [Is Blank] をクリックします。次に、[And] をクリックし、[And] の代わりに [Or] をクリックします。
- <!--[if !supportLists]-->3. <!--[endif]-->1 つ目のボックスの一覧の [Email] をクリックし、2 つ目のボックスの一覧の [Is Blank] をクリックします。次に、[And] をクリックし、[And] の代わりに [Or] をクリックします。
- <!--[if !supportLists]--> <!--[endif]-->1 つ目のボックスの一覧の [The Expression] をクリックし、次の式を入力します。
- [Disable This Control] チェック ボックスをオンにし (図 2 を参照)、[OK] を 3 回クリックします。
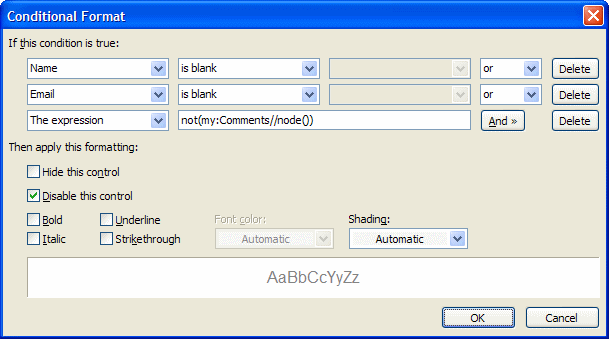
図 2 ボタンを無効にするために必要な条件
確認
フォームを初めてプレビューすると、[Name]、[Email]、[Comments] の各フィールドは、必須フィールドであることを示す赤いアスタリスク付きで表示されます。また、[Submit] ボタンが無効になっています。必須フィールドに入力すると、[Submit] ボタンが有効になるので、その後フォームを送信できます。図 3 は、必須フィールドに入力する前と入力した後のフォームを示しています。 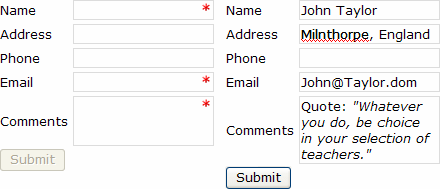
図 3 すべての必須フィールドの入力が済むまで送信ボタンは無効です
©2005 Greg Collins. All rights reserved. Licensed to Autonomy Systems, LLC for display on InfoPathDev.com.